- 发布于
Avolve Part-2
- 作者

- Name
- CuB3y0nd
- GitHub
- @CuB3y0nd
Table of Contents
这是 Avolve 系列的第二部分,我们使用 神经网络 和 遗传算法 编写模拟进化代码:
在这篇文章中,我们将为我们的项目奠定基础,并实现一个基本的前馈神经网络,该网络稍后将作为鸟的大脑。
系好安全带,我们要开始了!
准备工作
哦,开始一个新项目的乐趣!
mkdir avolve
cd avolve

# If you're using Git, it's also the time for:
git init
首先,我们必须确定我们使用的工具链版本。否则,如果你碰巧安装了较旧的工具链,则代码的某些部分将无法工作。
截至 2024.03.27,Rust 的最新稳定版本是 1.77.1,所以让我们创建一个名为 rust-toolchain 的文件,其中包含:
1.77.1
现在,对于更困难的部分,我们必须决定项目的结构如何安排。因为我们的项目将由许多独立的子模块(例如神经网络和遗传算法)组成,所以Cargo 工作空间会派上用场:
[workspace]
resolver = "2"
members = [
    "neural-network",
]
这意味着我们不会立即创建 src/main.rs,而是创建一个名为 libs 的目录并将我们的库 (Crates) 放在那里:
cargo new neural-network --name neural-network --lib
Note
组织工作区的方法有很多。你可以将所有内容储存到名为 crates 的目录中,而不是将所有内容保存在名为 libs 的目录中;或者,你也可以创建两个单独的目录,一个用于 application-crate,另一个用于 library-crate。
对此没有标准指南,请跟随你的直觉。
实现 propagate()
是时候开始谈正事了。
我们将从上往下开始,创建一个模拟整个网络的结构,它将为我们提供一个入口点;让我们打开 lib.rs 并写入:
#[derive(Debug)]
pub struct Network;
神经网络最关键的操作是传播数字:
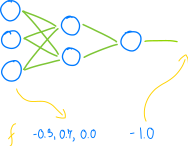
……所以:
#[derive(Debug)]
pub struct Network;

impl Network {
    pub fn propagate(&self, inputs: Vec<f32>) -> Vec<f32> {
        todo!()
    }
}
Note
虽然某些语言允许将「暂未实现」的函数留空:
int get_berry_number() {
  // TODO solve the paradox
}
但这在 rust 是错误的:
fn berry_number() -> usize {
  // TODO solve the paradox
}
error[E0308]: mismatched types
 --> src/lib.rs
  |
1 | fn berry_number() -> usize {
  |    ------------      ^^^^^ expected `usize`, found `()`
  |    |
  |    implicitly returns `()` as its body has no tail or `return`
  |    expression
这是因为 rust 中几乎所有内容都是表达式:
let value = if condition {
    "computer says yass"
} else {
    "computer says no"
};

let value = loop {
    break 123;
};

let value = {
    // empty block is an expression, too
};
……所以 rust 看到的实际是:
fn berry_number() -> usize {
    return ();
}
() 被称为单元类型。
为了解决这个问题,rust 提供了两个宏:todo!() 和它的老表弟 unimplemented!()。
这两个宏都允许编译代码,并且在运行中遇到时会导致应用程序安全崩溃:
thread 'main' panicked at 'not yet implemented'
网络是由众多的层构建的:
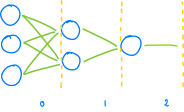
……所以:
#[derive(Debug)]
pub struct Network {
  layers: Vec<Layer>,
}

#[derive(Debug)]
struct Layer;
层是由神经元构建的:
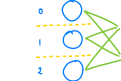
……传递神经元:
#[derive(Debug)]
struct Layer {
  neurons: Vec<Neuron>,
}
最终,神经元包含偏置和输出权重:

#[derive(Debug)]
struct Neuron {
    bias: f32,
    weights: Vec<f32>,
}
初始设计的完整代码:
#[derive(Debug)]
pub struct Network {
    layers: Vec<Layer>,
}

impl Network {
    pub fn propagate(&self, inputs: Vec<f32>) -> Vec<f32> {
        todo!()
    }
}

#[derive(Debug)]
struct Layer {
    neurons: Vec<Neuron>,
}

#[derive(Debug)]
struct Neuron {
    bias: f32,
    weights: Vec<f32>,
}
Nice.
Note
你可能会注意到我们只有两个对象是公共的:Network 和 Network::propagate()。
这是因为 Layer 和 Neuron 只是一个实现细节,我们不会将它们暴露在外,没有这个必要。
通过这种方法,我们可以在不对下游(我们库的用户)造成破坏性变化的情况下对我们的实现进行更改。
例如,Real Neural Networks™ 通常使用矩阵实现。如果我们决定重写我们的网络以使用矩阵,那么这不会是一个破坏性的变化:Network::propagate() 的签名将保持不变,由于用户无法访问 Layer 和 Neuron,用户将无法注意到它们其实已经消失了。
接下来,由于数字必须通过每一层,所以我们还需要在那里有一个 propagate():
impl Layer {
    fn propagate(&self, inputs: Vec<f32>) -> Vec<f32> {
        todo!()
    }
}
有了 Layer::propagate(),我们就可以接着实现 Network::propagate() 了:
impl Network {
    pub fn propagate(&self, inputs: Vec<f32>) -> Vec<f32> {
        let mut inputs = inputs;

        for layer in &self.layers {
            inputs = layer.propagate(inputs);
        }

        inputs
    }
}
这是一段相当令人满意、正确的代码。但它不是惯用的,我们还可以把它写得更好、更质朴!

首先,这称为隐藏 (Shadowing),或者叫遮蔽:
let mut inputs = inputs;
……这是不必要的。我们不妨将 mut 赋予函数的参数:
impl Network {
    pub fn propagate(&self, mut inputs: Vec<f32>) -> Vec<f32> {
        for layer in &self.layers {
            inputs = layer.propagate(inputs);
        }

        inputs
    }
}
Note
但是,这难道不会迫使我们的调用者传递可变值吗?不会!
fn process(mut items: Vec<f32>) {
    // do something
}

fn main() {
    let items = vec![1.2, 3.4, 5.6];
    // ^ no `mut` needed here

    process(items);
    //      ^ just works
}
原因是我们刚刚引入的 mut 出现在所谓的绑定位置:
fn foo_1(items: &[f32]) {
    //   ^^^^^  ------
    //  binding  type
    // (immut.) (immut.)
}

fn foo_2(mut items: &[f32]) {
    //   ^^^^^^^^^  ------
    //    binding    type
    //   (mutable) (immut.)
}

fn foo_3(items: &mut [f32]) {
    //   ^^^^^  ----------
    //  binding    type
    // (immut.)  (mutable)
}

fn foo_4(mut items: &mut [f32]) {
    //   ^^^^^^^^^  ----------
    //    binding      type
    //   (mutable)   (mutable)
}

struct Person {
    name: String,
    eyeball_radius: usize,
}

fn decompose(Person { name, mut eyeball_radius }: Person) {
    //       ^^^^^^^^^^^^^^^^^^^^^^^^^^^^^^^^^^^  ------
    //                     binding                 type
    // (partially immutable, partially mutable) (immutable)
}
……与类型相反,绑定是函数本地的:
fn foo(items: &mut Vec<usize>) {
    // When a type is mutable, you can modify the thing being
    // referenced:
    items.push(1234);

    // But if the binding remains immutable, you cannot modify
    // *which* thing is referenced:
    items = some_another_vector;
    //    ^ error: cannot assign to immutable argument
}

fn bar(mut items: &Vec<usize>) {
    // On the other hand, when a binding is mutable, you can change
    // *which* thing is referenced:
    items = some_another_vector;

    // But if the type remains immutable, you cannot modify the
    // thing itself:
    items.push(1234);
    //   ^^^^^ error: cannot borrow `*items` as mutable, as it is
    //         behind a `&` reference
}
我们还可以对代码进行进一步的改进,这种模式称为 折叠 (Folding):
for layer in &self.layers {
    inputs = layer.propagate(inputs);
}
……rust 的标准库为其提供了专用函数:
impl Network {
    pub fn propagate(&self, inputs: Vec<f32>) -> Vec<f32> {
        self.layers
            .iter()
            .fold(inputs, |inputs, layer| layer.propagate(inputs))
    }
}
.fold(),但是如果你发现它们晦涩难懂,你完全可以使用自己的方式实现!)由于闭包,我们甚至不需要 mut inputs,现在你可以吹嘘你的代码全都是函数式的,就像 Haskell 一样。
让我们继续讨论神经元。单个神经元接受多个输入并返回一个输出,因此:
#[derive(Debug)]
struct Neuron {
    bias: f32,
    weights: Vec<f32>,
}

impl Neuron {
    fn propagate(&self, inputs: Vec<f32>) -> f32 {
        todo!()
    }
}
和之前一样,我们可以回溯到实现 Layer::propagate():
#[derive(Debug)]
struct Layer {
    neurons: Vec<Neuron>,
}

impl Layer {
    fn propagate(&self, inputs: Vec<f32>) -> Vec<f32> {
        let mut outputs = Vec::new();

        for neuron in &self.neurons {
            let output = neuron.propagate(inputs);
            outputs.push(output);
        }

        outputs
    }
}
如果我们尝试编译它,我们会遇到第一个 borrow-checker 错误:
error[E0382]: use of moved value: `inputs`
  --> src/lib.rs
   |
   |     fn propagate(&self, inputs: Vec<f32>) -> Vec<f32> {
   |                         ------ move occurs because `inputs` has
   |                                type `Vec<f32>`, which does not
   |                                implement the `Copy` trait
  ...
   |             let output = neuron.propagate(inputs);
   |                                           ^^^^^^
   |                                value moved here, in previous
   |                                iteration of loop
显然,编译器是正确的:调用 neuron.propagate(inputs) 后,我们失去了对 inputs 的所有权,因此我们不能在循环的后续迭代中使用它。
幸运的是,修复很简单,归根结底就是让 Neuron::propagate() 在借来的值上工作:
impl Layer {
    fn propagate(&self, inputs: Vec<f32>) -> Vec<f32> {
        /* ... */

        for neuron in &self.neurons {
            let output = neuron.propagate(&inputs);
            /* ... */
        }

        /* ... */
    }
}

/* ... */

impl Neuron {
    fn propagate(&self, inputs: &[f32]) -> f32 {
        /* ... */
    }
}
重申一下,我们目前的代码是:
impl Layer {
    fn propagate(&self, inputs: Vec<f32>) -> Vec<f32> {
        let mut outputs = Vec::new();

        for neuron in &self.neurons {
            let output = neuron.propagate(&inputs);
            outputs.push(output);
        }

        outputs
    }
}
……这种特殊的模式称为 映射 (Mapping),标准库为此也提供了一种方法!
impl Layer {
    fn propagate(&self, inputs: Vec<f32>) -> Vec<f32> {
        self.neurons
            .iter()
            .map(|neuron| neuron.propagate(&inputs))
            .collect()
    }
}
目前我们除了完成 Neuron::propagate() 外没有别的可做的了。和以前一样,让我们从一个粗略的版本开始:
impl Neuron {
    fn propagate(&self, inputs: &[f32]) -> f32 {
        let mut output = 0.0;

        for i in 0..inputs.len() {
            output += inputs[i] * self.weights[i];
        }

        output += self.bias;

        if output > 0.0 {
            output
        } else {
            0.0
        }
    }
}
该片段包含两个不惯用的结构和一个潜在的错误,让我们从后者开始。
由于我们使用 inputs 的长度来迭代 self.weights,因此我们遇到了三种边缘情况:
- 当
inputs.len() < self.weights.len() - 当
inputs.len() == self.weights.len() - 当
inputs.len() > self.weights.len()
我们的代码建立在 #2 始终为真的假设上,但这是一个潜在的假设:我们没有在任何地方强制执行它!如果我们错误地传递了更少或更多的输入,我们将会得到一个无效的结果或者崩溃。
我们至少可以通过两种方法来改进它:
- 我们可以更改
Neuron::propagate()以返回错误信息:
impl Neuron {
    fn propagate(&self, inputs: &[f32]) -> Result<f32, String> {
        if inputs.len() != self.weights.len() {
            return Err(format!(
                "got {} inputs, but {} inputs were expected",
                inputs.len(),
                self.weights.len(),
            ));
        }

        /* ... */
    }
}
……或者,使用我最喜欢的 crates 之一——thiserror:
pub type Result<T> = std::result::Result<T, Error>;

#[derive(Debug, Error)]
pub enum Error {
    #[error("got {got} inputs, but {expected} inputs were expected")]
    MismatchedInputSize {
        got: usize,
        expected: usize,
    },
}

/* ... */

impl Neuron {
    fn propagate(&self, inputs: &[f32]) -> Result<f32> {
        if inputs.len() != self.weights.len() {
            return Err(Error::MismatchedInputSize {
                got: inputs.len(),
                expected: self.weights.len(),
            });
        }

        /* ... */
    }
}
- 我们可以使用
assert_eq!()/panic!():
impl Neuron {
    fn propagate(&self, inputs: &[f32]) -> f32 {
        assert_eq!(inputs.len(), self.weights.len());

        /* ... */
    }
}
在大多数情况下,第一种方案更好,因为它允许调用者捕获错误并处理它。但在我们的例子中,根本没必要这样。因为:
- 如果此断言失败,则意味着我们的实现很可能是错误的,并且用户无法采取任何措施来缓解该问题。
- 这只是一个玩具项目,今晚我们已经有了大约五十个其他想法,没有必要浪费我们的时间。
所以:
impl Neuron {
    fn propagate(&self, inputs: &[f32]) -> f32 {
        assert_eq!(inputs.len(), self.weights.len());

        /* ... */
    }
}
至于惯用方法,这个:
impl Neuron {
    fn propagate(&self, inputs: &[f32]) -> f32 {
        /* ... */

        if output > 0.0 {
            output
        } else {
            0.0
        }
    }
}
……是 f32::max() 的变体:
impl Neuron {
    fn propagate(&self, inputs: &[f32]) -> f32 {
        /* ... */

        output.max(0.0)
    }
}
而这个:
impl Neuron {
    fn propagate(&self, inputs: &[f32]) -> f32 {
        /* ... */

        let mut output = 0.0;

        for i in 0..inputs.len() {
            output += inputs[i] * self.weights[i];
        }

        /* ... */
    }
}
……可以使用 .zip() 简化:
impl Neuron {
    fn propagate(&self, inputs: &[f32]) -> f32 {
        /* ... */

        let mut output = 0.0;

        for (&input, &weight) in inputs.iter().zip(&self.weights) {
            output += input * weight;
        }

        /* ... */
    }
}
Note
诸如 input[i] 之类的数组索引操作总是会执行所谓的 边界检查 (bounds check)。这是一段确保索引位于数组边界内的代码,当它越界时会出现 panick:
fn main() {
    let numbers = vec![1];
    println!("{}", numbers[123]);
}
thread 'main' panicked at 'index out of bounds: the len is 1 but
the index is 123'
当你使用如 .zip() 或 .map() 这样的组合器而不是索引时,编译器会省略这些检查,使你的代码不仅更易读,而且更快。
……然后使用 .map() + .sum():
impl Neuron {
    fn propagate(&self, inputs: &[f32]) -> f32 {
        /* ... */

        let mut output = inputs
            .iter()
            .zip(&self.weights)
            .map(|(input, weight)| input * weight)
            .sum::<f32>();

        /* ... */
    }
}
最后一行中使用的 ::<> 语法称为 Turbofish。当编译器无法推断它们时,它允许提供显式通用参数。
……最后:
impl Neuron {
    fn propagate(&self, inputs: &[f32]) -> f32 {
        assert_eq!(inputs.len(), self.weights.len());

        let output = inputs
            .iter()
            .zip(&self.weights)
            .map(|(input, weight)| input * weight)
            .sum::<f32>();

        (self.bias + output).max(0.0)
    }
}
毫无疑问,它很漂亮。但是它有用吗?它能识别猫吗?我们可以用它来预测未来的狗狗币价格吗?
实现 new()
到目前为止,我们太专注于算法,以至于几乎没有考虑构造函数。但如果我们无法创建网络,我们又怎么能够进行操作呢?
我们创建构造函数的第一种方法可以是一个简单的、无操作的函数:
#[derive(Debug)]
pub struct Network {
    layers: Vec<Layer>,
}

impl Network {
    pub fn new(layers: Vec<Layer>) -> Self {
        Self { layers }
    }

    /* ... */
}
……但在这种情况下不行。因为,正如我们已经确定的,我们希望将 Layer 和 Neuron 保留在公共接口之外。
如果你看过我之前的文章,你可能还记得我们谈论了很多关于随机数的内容。所以我们需要类似于这样的东西:
impl Network {
    pub fn random() -> Self {
        todo!()
    }
}
为了随机化一个网络,我们需要知道它的层数和每层神经元的数量。它们都可以用一个向量来描述:
impl Network {
    pub fn random(neurons_per_layer: Vec<usize>) -> Self {
        todo!()
    }
}
……或者,以更优雅的方式:
#[derive(Debug)]
pub struct LayerTopology {
    pub neurons: usize,
}

impl Network {
    pub fn random(layers: Vec<LayerTopology>) -> Self {
        todo!()
    }

    /* ... */
}

// By the way, notice how creating a separate type allowed us to untangle
// argument's name to just `layers`.
//
// Initially we went with `neurons_per_layer`, because `Vec<usize>` doesn't
// provide enough information to tell what this `usize` represents - using a
// separate type makes the intention explicit.
现在,如果你仔细观察神经网络层:

……也许你会注意到它实际上是由两个数字定义的:它的输入和输出大小。这是否意味着我们的单字段 LayerTopology 是错误的?恰恰相反!
我们所做的,正如我所说的,是利用 域 知识。
在一个前馈神经网络中,所有的层都是按顺序连接的,从前到后:
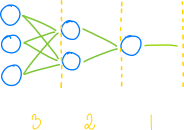
……因为 A 层的输出是 B 层的输入,如果我们选择:
#[derive(Debug)]
pub struct LayerTopology {
    pub input_neurons: usize,
    pub output_neurons: usize,
}
……那么我们不仅会使我们的接口难以管理,而且更糟糕的是,我们将不得不实现额外的验证,以确保 layer[0].output_neurons == layer[1].input_neurons 等条件得到满足。纯属无稽之谈!
注意这个简单的事实,即连续的层必须具有匹配的输入和输出,使我们能够在代码编写之前就简化代码。
一个粗略的实施方法是:
impl Network {
    pub fn random(layers: Vec<LayerTopology>) -> Self {
        let mut built_layers = Vec::new();

        for i in 0..(layers.len() - 1) {
            let input_size = layers[i].neurons;
            let output_size = layers[i + 1].neurons;

            built_layers.push(Layer::random(
                input_size,
                output_size,
            ));
        }

        Self { layers: built_layers }
    }
}
……现在让我们让它变得更 rustify。你猜当你调用 Network::random(vec![]) 会发生什么?
impl Network {
    pub fn random(layers: Vec<LayerTopology>) -> Self {
        // Network with just one layer is technically doable, but doesn't
        // make much sense:
        assert!(layers.len() > 1);

        /* ... */
    }
}
好了,更好了。
至于 for 循环,通过相邻项迭代是标准库涵盖的另一种模式,通过名为 .windows() 的函数实现这一点:
impl Network {
    pub fn random(layers: Vec<LayerTopology>) -> Self {
        /* ... */

        for adjacent_layers in layers.windows(2) {
            let input_size = adjacent_layers[0].neurons;
            let output_size = adjacent_layers[1].neurons;

            /* ... */
        }

        /* ... */
    }
}
Note
如果你了解解构,你可能会考虑进一步重写此循环:
for [fst, snd] in layers.windows(2) {
    built_layers.push(Layer::random(fst.neurons, snd.neurons));
}
……但遗憾的是,编译器表示不行:
error[E0005]: refutable pattern in `for` loop binding: `&[]`,
              `&[_]` and `&[_, _, _, ..]` not covered
 --> src/lib.rs
  |
  |     for [fst, snd] in layers.windows(2) {
  |         ^^^^^^^^^^ patterns `&[]`, `&[_]` and `&[_, _, _, ..]`
  |                    not covered
  |
  = note: the matched value is of type `&[LayerTopology]`
编译器并不知道 .windows(2) 返回恰好两个元素的数组。在它看来,.windows(2) 可能返回大小不一的数组,不一定匹配我们的模式。
(顺便说一句,这就是可反驳模式的含义:它是一个不匹配所有可能情况的模式。其反义词是不可反驳模式,只有那些在这样的地方才被允许。)
Nightly 版的 rust,在稳定了部分 const 泛型的情况下,提供了一种解决方案——.array_windows():
#![feature(array_windows)]

for [fst, snd] in layers.array_windows() {
    built_layers.push(Layer::random(fst.neurons, snd.neurons));
}
……但为了简单起见,我们将避开 const 泛型,继续使用稳定的函数。
在这种情况下,切换到迭代器对我来说是理所当然的:
impl Network {
    pub fn random(layers: Vec<LayerTopology>) -> Self {
        let layers = layers
            .windows(2)
            .map(|layers| Layer::random(layers[0].neurons, layers[1].neurons))
            .collect();

        Self { layers }
    }
}
最后一步。当不会使代码变得笨拙时,使用借用而不是获得所有权是一个很好的实践:
impl Network {
    pub fn random(layers: &[LayerTopology]) -> Self {
        /* ... */
    }
}
通常,使用借用的值在函数内部不会发生太大变化,但它会使函数更加灵活。也就是说,现在可以通过一个借用数组来进行:
let network = Network::random(&[
    LayerTopology { neurons: 8 },
    LayerTopology { neurons: 15 },
    LayerTopology { neurons: 2 },
]);
……和:
let layers = vec![
    LayerTopology { neurons: 8 },
    LayerTopology { neurons: 15 },
    LayerTopology { neurons: 2 },
];

let network_a = Network::random(&layers);
let network_b = Network::random(&layers);
//                              ^ no need to .clone()
接下来是什么?接下来是什么……检查笔记……Ah, Layer::random()!
impl Layer {
    fn random(input_size: usize, output_size: usize) -> Self {
        let mut neurons = Vec::new();

        for _ in 0..output_size {
            neurons.push(Neuron::random(input_size));
        }

        Self { neurons }
    }

    /* ... */
}
……或:
impl Layer {
    fn random(input_size: usize, output_size: usize) -> Self {
        let neurons = (0..output_size)
            .map(|_| Neuron::random(input_size))
            .collect();

        Self { neurons }
    }
}
Note
|_| (),也被称为厕所闭包 LMAO (Toilet Closure),是一个用于接受它不关心的参数的函数。
我们也可以写成:
.map(|output_neuron_id| Neuron::random(input))
……但是由于我们不必在任何地方读取此 output_neuron_id,因此将参数命名为 _(或 _output_neuron_id)更惯用,以注释它没有被使用的事实。
此外,_ 本身也称为占位符 (Placeholder),它可以在几种不同的上下文中使用:
// As a binding:
fn ignore_some_arguments(_: usize, b: usize, _: usize) {
    //                   ^                   ^
}

// ... but not as a name:
fn _() {
// ^ error: expected identifier, found reserved identifier `_`
}

// As a type:
fn load_files(paths: &[&Path]) -> Vec<String> {
    paths
        .iter()
        .map(std::fs::read_to_string)
        .collect::<Result<_, _>>()
    //                    ^  ^
        .unwrap()
}

// ... but only inside expressions:
fn what_am_i(foo: _) {
    //            ^ error: the type placeholder `_` is not allowed
    //              within types on item signatures
}
最后:
impl Neuron {
    fn random(input_size: usize) -> Self {
        let bias = todo!();

        let weights = (0..input_size)
            .map(|_| todo!())
            .collect();

        Self { bias, weights }
    }

    /* ... */
}
与 C++ 或 Python 相反,Rust 的标准库不提供任何伪随机数生成器。你知道这意味着什么吗?
一说到伪随机数生成器 (PRNG),rand 可谓是 rust 的标准,它是一个用途及其广泛的 crate,不仅可以生成伪随机数,还可以生成其它类型,比如字符串。
为了使用 rand,我们必须将其添加到 Cargo.toml 中:
# ...

[dependencies]
rand = "0.8.5"
……然后:
use rand::Rng;

/* ... */

impl Neuron {
    fn random(input_size: usize) -> Self {
        let mut rng = rand::thread_rng();
        let bias = rng.gen_range(-1.0..=1.0);

        let weights = (0..input_size)
            .map(|_| rng.gen_range(-1.0..=1.0))
            .collect();

        Self { bias, weights }
    }
}
Note
0..3 是匹配 的半开区间。
0..=3 是匹配 的闭区间。
Neat.
现在,我们如何确保我们的整个网络按预期工作呢?
编写测试代码
纯函数是一个给定相同参数时,总是返回相同值的函数。例如,这是一个纯函数:
pub fn add(x: usize, y: usize) -> usize {
    x + y
}
……而这个不是:
pub fn read(path: impl AsRef<Path>) -> String {
    std::fs::read_to_string(path).unwrap()
}
add(1, 2) 将始终返回 3,而 read("file.txt") 将根据文件当前包含的内容返回不同的字符串。)纯函数的好处在于它们可以单独测试:
// This test always succeeds
// (i.e it is *deterministic*)
#[test]
fn test_add() {
    assert_eq!(add(1, 2), 3);
}

// This test might succeed or it might fail, impossible to anticipate
// (i.e. it is *indeterministic*)
#[test]
fn test_read() {
    assert_eq!(
        std::fs::read_to_string("serials-to-watch.txt"),
        "killing eve",
    );
}
不幸的是,我们在 Neuron::random() 中生成数字的方式使其成为非纯函数,这可以通过以下方式轻松证明:
#[test]
fn random_is_pure() {
    let neuron_a = Neuron::random(4);
    let neuron_b = Neuron::random(4);

    // If `Neuron::random()` was pure, then both neurons would always have
    // to be the same:
    assert_eq!(neuron_a, neuron_b);
}
测试非纯函数很困难,因为我们无法可靠地断言:
/* ... */

#[cfg(test)]
mod tests {
    use super::*;

    #[test]
    fn random() {
        let neuron = Neuron::random(4);

        assert!(/* what? */);
    }
}
我们可以尝试:
#[test]
fn test() {
    let neuron = Neuron::random(4);

    assert_eq!(neuron.weights.len(), 4);
}
……但这只是一个无用的测试,它实际上不能证明任何事情。
另一方面,让 Neuron::random() 成为一个纯函数似乎……很荒谬?如果结果始终保持不变,那么随机化的意义又何在?
我通常调和两个世界的方式是看不纯度的来源。在这种情况下,它是:
impl Neuron {
    fn random(input_size: usize) -> Self {
        let mut rng = rand::thread_rng(); // whoopsie

        /* ... */
    }
}
如果我们不调用 thread_rng(),而是使用随机数发生器接受一个参数:
use rand::{Rng, RngCore};

/* ... */

impl Network {
    pub fn random(rng: &mut dyn RngCore, layers: &[LayerTopology]) -> Self {
        let layers = layers
            .windows(2)
            .map(|layers| Layer::random(rng, layers[0].neurons, layers[1].neurons))
            .collect();

        /* ... */
    }

    /* ... */
}

/* ... */

impl Layer {
    fn random(rng: &mut dyn RngCore, input_size: usize, output_size: usize) -> Self {
        let neurons = (0..output_size)
            .map(|_| Neuron::random(rng, input_size))
            .collect();

        /* ... */
    }

    /* ... */
}

/* ... */

impl Neuron {
    fn random(rng: &mut dyn RngCore, input_size: usize) -> Self {
        /* ... */
    }

    /* ... */
}
……现在,我们可以在测试中使用假的、可预测的 PRNG,而用户只需传递他们选择的实际 PRNG。
Note
你可以使用类似的模式来测试程序的输出,如果不是使用:
fn do_something() {
    println!("Doing something...");
    println!("... done!");
}
……你用:
fn do_something(stdout: &mut dyn Write) {
    writeln!(stdout, "Doing something...").unwrap();
    writeln!(stdout, "... done!").unwrap();
}
……然后你就可以很容易地测试输出:
#[test]
fn ensure_something_happens() {
    let mut stdout = String::new();
    do_something(&mut stdout);

    assert_eq!(stdout, "Doing something...\n... done!\n");
}
这非常方便。
无论是 do_something() 还是 random() 在技术上都不是纯函数,因为它们都缺乏一种叫做引用透明性的属性。尽管,如果有人坚持,总是可以使用:
fn do_something<W: Write>(stdout: W) -> W {
    /* ... */
}
因为 rand crate 不提供可预测或可种子的 PRNG,所以我们必须使用另一个 crate。我推荐 rand_chacha:
# ...

[dependencies]
rand = "0.8.5"

[dev-dependencies]
rand_chacha = "0.3.1"
……这使我们能够:
#[cfg(test)]
mod tests {
    use super::*;
    use rand::SeedableRng;
    use rand_chacha::ChaCha8Rng;

    #[test]
    fn random() {
        // Because we always use the same seed, our `rng` in here will
        // always return the same set of values
        let mut rng = ChaCha8Rng::from_seed(Default::default());
        let neuron = Neuron::random(&mut rng, 4);

        assert_eq!(neuron.bias, /* ... */);
        assert_eq!(neuron.weights, &[/* ... */]);
    }
}
我们还不知道将返回哪些数字,但找出答案很容易。我们只需从零开始,然后从测试输出中复制粘贴数字:
#[test]
fn random() {
    /* ... */

    assert_eq!(neuron.bias, 0.0);
    assert_eq!(neuron.weights, &[0.0, 0.0, 0.0, 0.0]);
}
第一次 cargo test 给我们带来了:
thread '...' panicked at 'assertion failed: `(left == right)`
  left: `-0.6255188`,
 right: `0.0`
……所以:
#[test]
fn random() {
    /* ... */

    assert_eq!(neuron.bias, -0.6255188);

    /* ... */
}
另一个 cargo test:
thread '...' panicked at 'assertion failed: `(left == right)`
  left: `[0.67383957, 0.8181262, 0.26284897, 0.5238807]`,
 right: `[0.0, 0.0, 0.0, 0.0]`', src/lib.rs:29:5
……我们最终得到:
#[test]
fn random() {
    /* ... */

    assert_eq!(
        neuron.weights,
        &[0.67383957, 0.8181262, 0.26284897, 0.5238807]
    );
}
注意,数字是不同的,这没关系。只要每个 cargo test 始终在同一组数字上工作,它们就可以不同(而且它确实如此,因为我们使用了带有恒定种子的 PRNG)。
在继续之前,我们还需要讨论一个话题:浮点数不精确性。
我们使用的类型 f32 模拟了一个 32 位浮点数,它可以表示 ~1.2*10^-38 和 ~3.4*10^38 之间的值。可惜,它不能表示所有这些数字,只能表示一些数字。
例如,使用 f32 不能精确地编码 ,它总是会偏离一点:
fn main() {
    println!("{:.10}", 0.15f32);
    // prints: 0.1500000060
}
…… 也是同理:
fn main() {
   println!("{:.10}", 0.45f32);
   // prints: 0.4499999881
}
通常情况下这并不重要,因为浮点数从未被设计成精确的(只是快速的)。但当它出现问题时,它会像一块从天而降的砖头一样打击你:
#[test]
fn test() {
    assert_eq!(0.45f32, 0.15 + 0.15 + 0.15);
}
thread 'test' panicked at 'assertion failed: `(left == right)`
  left: `0.45`,
 right: `0.45000002`'
为了避免重新造轮子,我会给出链接:What Every Programmer Should Know About Floating-Point Arithmetic,如果你还没有阅读过有关浮点数的内容,我鼓励你尝试一下!
那么,如果我们不能精确地比较数字,我们该怎么办?大致比较一下吧!
#[test]
fn test() {
    let actual: f32 = 0.1 + 0.2;
    let expected = 0.3;

    assert!((actual - expected).abs() < f32::EPSILON);
}
这是在所有实现 IEEE 754 的编程语言中比较浮点数的标准方式(所以,就像所有编程语言一样),与其寻求精确结果,不如用误差范围(也称为容差)来比较两个数字。
因为用这种方式比较数字有些麻烦,所以更舒适的做法是通过宏:
macro_rules! assert_almost_eq {
    ($left:expr, $right:expr) => {
        let left: f32 = $left;
        let right: f32 = $right;

        assert!((left - right).abs() < f32::EPSILON);
    }
}

#[test]
fn test() {
    assert_almost_eq!(0.45f32, 0.15 + 0.15 + 0.15);
}
……或者,可以使用像 approx 这样的 crate:
#[test]
fn test() {
    approx::assert_relative_eq!(0.45f32, 0.15 + 0.15 + 0.15);
}
我个人喜欢 approx,所以让我们将它添加到我们的神经网络的 Cargo.toml 中:
# ...

[dev-dependencies]
rand_chacha = "0.3.1"
approx = "0.5.1"
……然后调整测试代码:
use super::*;
use approx::assert_relative_eq;
use rand::SeedableRng;
use rand_chacha::ChaCha8Rng;

#[test]
fn random() {
    let mut rng = ChaCha8Rng::from_seed(Default::default());
    let neuron = Neuron::random(&mut rng, 4);

    assert_relative_eq!(neuron.bias, -0.6255188);

    assert_relative_eq!(
        neuron.weights.as_slice(),
        [0.67383957, 0.8181262, 0.26284897, 0.5238807].as_ref()
    );
}
这涵盖了神经元一半的功能。值得庆幸的是,根据我们现在所知道的,为 Neuron::propagate() 编写测试会很容易:
#[cfg(test)]
mod tests {
    /* ... */

    #[test]
    fn random() {
        /* ... */
    }

    #[test]
    fn propagate() {
        todo!()
    }
}
Note
你可能听说过,根据测试的前提条件和期望来命名测试是很有用的。
通常这是正确的,如果我们正在编写一个商店,那么像这样构建其测试可能会很有用:
#[cfg(test)]
mod tests {
    use super::*;

    mod cart {
        use super::*;

        mod when_user_adds_a_flower_to_their_cart {
            use super::*;

            #[test]
            fn user_can_see_this_flower_in_their_cart() {
                /* ... */
            }

            #[test]
            fn user_can_remove_this_flower_from_their_cart() {
                /* ... */
            }

            mod and_submits_order {
                /* ... */
            }

            mod and_abandons_cart {
                /* ... */
            }
        }
    }
}
问题在于我们的 Neuron 不是典型的「业务代码」,并且许多「业务代码模式」不太适用于数学代码。如果我们需要考虑一些边缘情况,比如:
fn propagate(/* ... */) {
    if /* ... */ {
        do_foo()
    } else {
        do_bar()
    }
}
……那么,创建两个单独的测试就有意义了:
#[cfg(test)]
mod tests {
    use super::*;

    mod propagate {
        use super::*;

        mod given_neuron_with_foo {
            use super::*;

            #[test]
            fn fooifies_it() {
                /* ... */
            }
        }

        mod given_neuron_thats_bar {
            use super::*;

            #[test]
            fn bars_it() {
                /* ... */
            }
        }
    }
}
……但就我们目前的代码而言,我们最好只是使用简单的 fn random() 和 fn propagate()。
如何确保 propagate() 正确工作呢?通过手动计算预期响应:
#[test]
fn propagate() {
    let neuron = Neuron {
        bias: 0.5,
        weights: vec![-0.3, 0.8],
    };

    // Ensures `.max()` (our ReLU) works:
    assert_relative_eq!(
        neuron.propagate(&[-10.0, -10.0]),
        0.0,
    );

    // `0.5` and `1.0` chosen by a fair dice roll:
    assert_relative_eq!(
        neuron.propagate(&[0.5, 1.0]),
        (-0.3 * 0.5) + (0.8 * 1.0) + 0.5,
    );

    // We could've written `1.15` right away, but showing the entire
    // formula makes our intentions clearer
}
从这一点来看,实现 Layer 和 Network 的测试变得非常简单,因此已作为读者的练习:-)
结语
我们究竟创造了什么?
看起来我们所实现的与学习或模拟无关:
- 眼睛呢?
- 负责移动的代码在哪里?
- ...
不必担心,最终所有的部分都将拼凑在一起!
同时,随时欢迎查看源码。
为什么我们的设计会显得臃肿?
当你从头开始搜索 python neural network from scratch 时,你会发现很多文章将 FFNN 封装在几行 Python 代码中。与它们相比,我们的设计显得有些夸张,为什么会这样呢?
这是因为通过这种方式我们能学到更多东西。我们本可以使用 nalgebra 将我们的网络编写成当前大小的十分之一,也可以使用任何现有的 crate之一实现它。但重要的不是目的地,而是旅程本身!
下一步如何?
目前,我们手头已经有了一个基本的 FFNN。在下一篇文章中,我们将实现遗传算法,并将其连接到我们的神经网络。最后一篇文章将是关于如何使用 WebAssembly 将我们的 crates 组合在一起,最终得到我们的杰作:Avolve。